For the baby shower event, I think this will be a unique gift for the mother who is happy, a diaper bike. I found on the internet tutorial to make a diaper bike, if you want to make a diaper bike itself, the following tutorial I am going to share with you


**This tutorial is for personal use only. Make as many as you want for yourself or to give as a gift. Instructions and pictures are not to be copied or duplicated. You can place my link on your blog/website if you would like to share this tutorial. Thank you! {wink}**
THANKS TO Sweetaprils.com for sharing this tutorial
What materials needs to be prepared: 34 diapers Pampers Swaddlers Size 1 (17 for each tire), 8" cake pan, 2 rubber bands, 2 receiving blankets (30x30 approx), 2 bibs, 1 chain link toy, a pair of socks or mittens, a baby bottle, 1 washcloth, scissors, pins, a stuffed animal (size approx between 15" and up to 20"), and decorative ribbon.
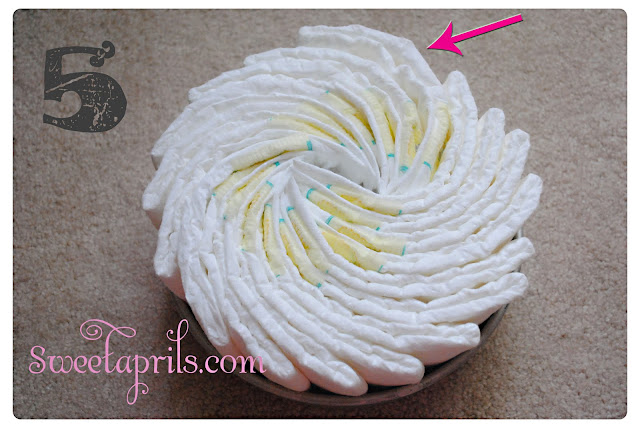
Make sure the gab between each diaper is even. See above picture 5? They are not even.
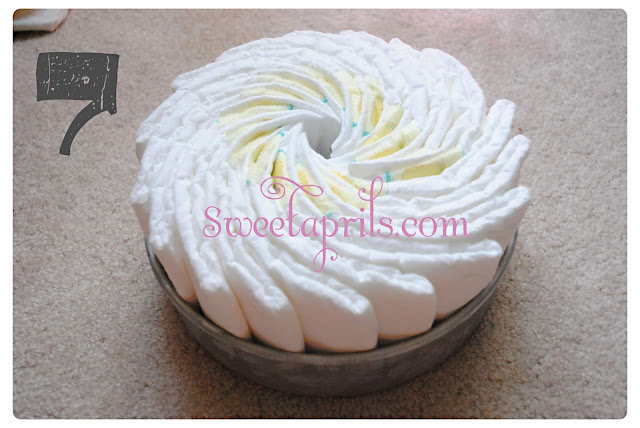
Pic #6: With one hand on top of the diaper, use the other hand to start pulling each diaper to the right until they all are even. Pic 7 is looking better...but pic 8 is perfect!
For pic 13: wrap each tire with ribbon of your choice. Place a pink to secure ribbon. The pin will at be the bottom of the tire. Do the same for the other tire. PLEASE NOTICE THAT THE FOLLOWING PICTURES DON'T HAVE THE RIBBON AROUND THE TIRES BECAUSE I FORGOT!!! I WAS TOO EXCITED! But make sure the ribbon is around the tires for the rest of the instructions. :)
Pic #14: Fold first receiving blanket in half...and roll it up like in pic #15
Pic 16: If you want you can secure the end of the rolled up blanket with a pin just until you place the blanket through the tire opening.
Picture 20: PLEASE note that we are working on the BACK tire.
For pic 24: Pull both ends of the blanket (following the arrows) to make sure the 2 tires are tight and the blanket too. Not too tight but firm. This will hold your entire motorcycle! Remember we are still working on the back tire.
For pic 25 place a pin in the inside of the tire opening securing the 2 blankets against the diapers. Make sure the pin is all the way in! then tuck in the remaining of the 2 ends of the blanket in the opining of the tire. You can see the finished back tire on Pic 29.
Pic 26 shows the front tire first.
We are going to work on the handle now...Pic #28: roll up the second blanket...
Pic 29: Place the rolled up blanket through the opening of the FRONT tire.
Pic 35: If you would like you can roll up the wash cloth around the baby bottle.
To make the handle bars more stable follow instructions on pic 37 and 38
Pic 39: Put tissue paper inside the sock or mittens...it just looks better!
Pic 42: Place the other bib on top of the back tire.

What do you think???!!!
